


In this article, we will be creating a simple RESTful web service using SpringBoot and MongoDB. We will be using GridFS to store files.
What is GridFS?
GridFS is a specification for storing and retrieving files that exceed the BSON-document size limit of 16MB. (Source: MongoDB Manual)
GridFS divide the file into small parts called chunks and store them as separate documents. The default size of a chunk is 255KB.
GridFS uses two collections to store files.
fs.files - store binary chunks of the file.
fs.chunks - store file’s metadata.
](https://cdn-images-1.medium.com/max/2000/0*tNMb1smzqFdz3aS2.png)
We’ll start by creating the REST APIs for uploading and downloading and test them using Postman. Alright! Let’s get to it.
1. Creating a project
Visit https://start.spring.io to generate the application through Spring Initializr with the following dependencies. This should download a zip file which you need to extract and open in your IDE.

2. Spring Boot Properties
Following configurations must be provided in the application.properties file in the “resources” folder.
Following are the MongoDB properties:
spring.data.mongodb.port = 27017
spring.data.mongodb.host = localhost
spring.data.mongodb.database = uploads

server.port=8080
The default port for service is 8080. You can change the port if you want. Also You can add authentication if you have any.
You can also use MongoDB Atlas instead of running MongoDB on localhost. Use the following properties in your application.
Replace <passsword> with admin’s password and <database> with the database name.
spring.data.mongodb.uri=mongodb+srv://admin:**<password>**@cluster0.eypdh.mongodb.net/**<database>**?retryWrites=true&w=majority
In addition, the following properties should be added to allow file uploading.
spring.servlet.multipart.enabled = true
spring.servlet.multipart.max-file-size = 200MB
spring.servlet.multipart.max-request-size = 200MB
3. Defining Classes
Note that we are not defining a document class here since we will only upload a file and it will directly store in the GridFS Collection.
The following class will be used to return the necessary responses when downloading a file.
package com.demo.fileUpload.model;

public class LoadFile {

    private String filename;
    private String fileType;
    private String fileSize;
    private byte[] file;

    public LoadFile() {
    }

    public String getFilename() {
        return filename;
    }

    public void setFilename(String filename) {
        this.filename = filename;
    }

    public String getFileType() {
        return fileType;
    }

    public void setFileType(String fileType) {
        this.fileType = fileType;
    }

    public String getFileSize() {
        return fileSize;
    }

    public void setFileSize(String fileSize) {
        this.fileSize = fileSize;
    }

    public byte[] getFile() {
        return file;
    }

    public void setFile(byte[] file) {
        this.file = file;
    }
}
4. Creating the Service Class
This service class contains the service to store and retrieve a file from GridFS.
package com.demo.fileUpload.service;

import com.demo.fileUpload.model.LoadFile;
import com.mongodb.BasicDBObject;
import com.mongodb.DBObject;
import com.mongodb.client.gridfs.model.GridFSFile;
import org.apache.commons.io.IOUtils;
import org.springframework.beans.factory.annotation.Autowired;
import org.springframework.data.mongodb.core.query.Criteria;
import org.springframework.data.mongodb.core.query.Query;
import org.springframework.data.mongodb.gridfs.GridFsOperations;
import org.springframework.data.mongodb.gridfs.GridFsTemplate;
import org.springframework.stereotype.Service;
import org.springframework.web.multipart.MultipartFile;

import java.io.IOException;

@Service
public class FileService {

    @Autowired
    private GridFsTemplate template;

    @Autowired
    private GridFsOperations operations;

    public String addFile(MultipartFile upload) throws IOException {

        DBObject metadata = new BasicDBObject();
        metadata.put("fileSize", upload.getSize());

        Object fileID = template.store(upload.getInputStream(), upload.getOriginalFilename(), upload.getContentType(), metadata);

        return fileID.toString();
    }


    public LoadFile downloadFile(String id) throws IOException {

        GridFSFile gridFSFile = template.findOne( new Query(Criteria.where("_id").is(id)) );

        LoadFile loadFile = new LoadFile();

        if (gridFSFile != null && gridFSFile.getMetadata() != null) {
            loadFile.setFilename( gridFSFile.getFilename() );

            loadFile.setFileType( gridFSFile.getMetadata().get("_contentType").toString() );

            loadFile.setFileSize( gridFSFile.getMetadata().get("fileSize").toString() );

            loadFile.setFile( IOUtils.toByteArray(operations.getResource(gridFSFile).getInputStream()) );
        }

        return loadFile;
    }

}
Storing a file
addFile() method will store the file in the database and returns the Object ID of the file.
You can add extra information to your file as metadata. As an example, I have added file size as additional information. But it is not a must.
To store the file you need to pass the following data to the store method in GridFsTemplate.
template.store(Inputstream content, filename, ContentType, metadata)
Retrieving a file
downloadFile() method is used to return a specific file from the database.
findOne method in GridFSTemplate will return the file that matches the query.
Then, we set the response and its content to an Object from LoadFile class we created in Step 1 and return it.
We need to set the file to a byte array. To convert the InputStream into a byte array we are using Apache Commons IO.
For that, you need to add the following dependency in your pom.xml file.
<dependency>
   <groupId>commons-io</groupId>
   <artifactId>commons-io</artifactId>
   <version>2.8.0</version>
</dependency>
5. Creating the Controller
The controller class consist of the REST APIs for uploading and downloading a file.
package com.demo.fileUpload.controller;

import com.demo.fileUpload.model.LoadFile;
import com.demo.fileUpload.service.FileService;
import org.springframework.beans.factory.annotation.Autowired;
import org.springframework.core.io.ByteArrayResource;
import org.springframework.http.HttpHeaders;
import org.springframework.http.HttpStatus;
import org.springframework.http.MediaType;
import org.springframework.http.ResponseEntity;
import org.springframework.web.bind.annotation.*;
import org.springframework.web.multipart.MultipartFile;

import java.io.IOException;

@RestController
@CrossOrigin("*")
@RequestMapping("file")
public class FileController {

    @Autowired
    private FileService fileService;

    @PostMapping("/upload")
    public ResponseEntity<?> upload(@RequestParam("file")MultipartFile file) throws IOException {
        return new ResponseEntity<>(fileService.addFile(file), HttpStatus.OK);
    }

    @GetMapping("/download/{id}")
    public ResponseEntity<ByteArrayResource> download(@PathVariable String id) throws IOException {
        LoadFile loadFile = fileService.downloadFile(id);

        return ResponseEntity.ok()
                .contentType(MediaType.parseMediaType(loadFile.getFileType() ))
                .header(HttpHeaders.CONTENT_DISPOSITION, "attachment; filename=\"" + loadFile.getFilename() + "\"")
                .body(new ByteArrayResource(loadFile.getFile()));
    }

}
POST
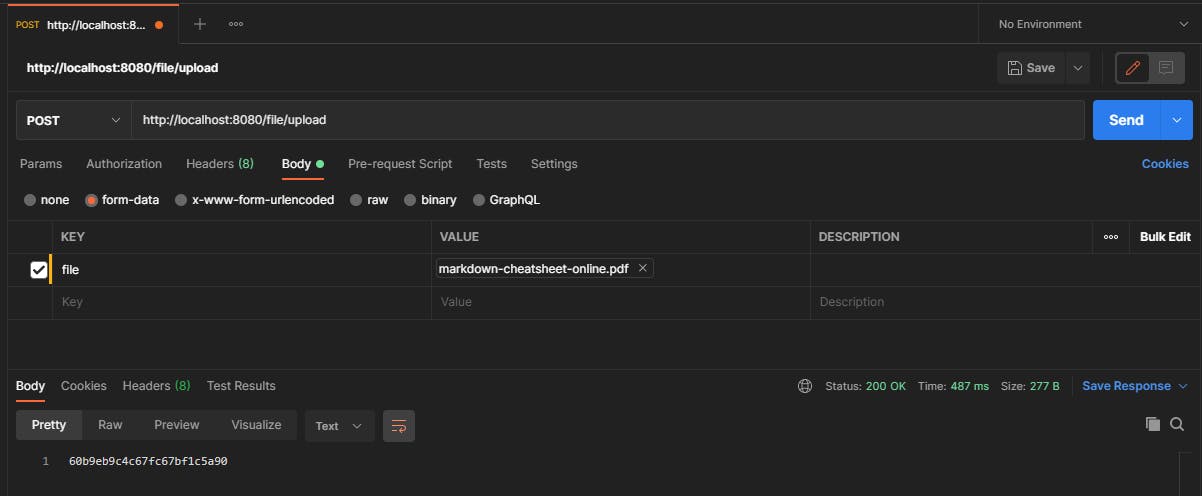
To upload a file we use the POST method.
The upload() method accepts a MultipartFile type object here.
GET
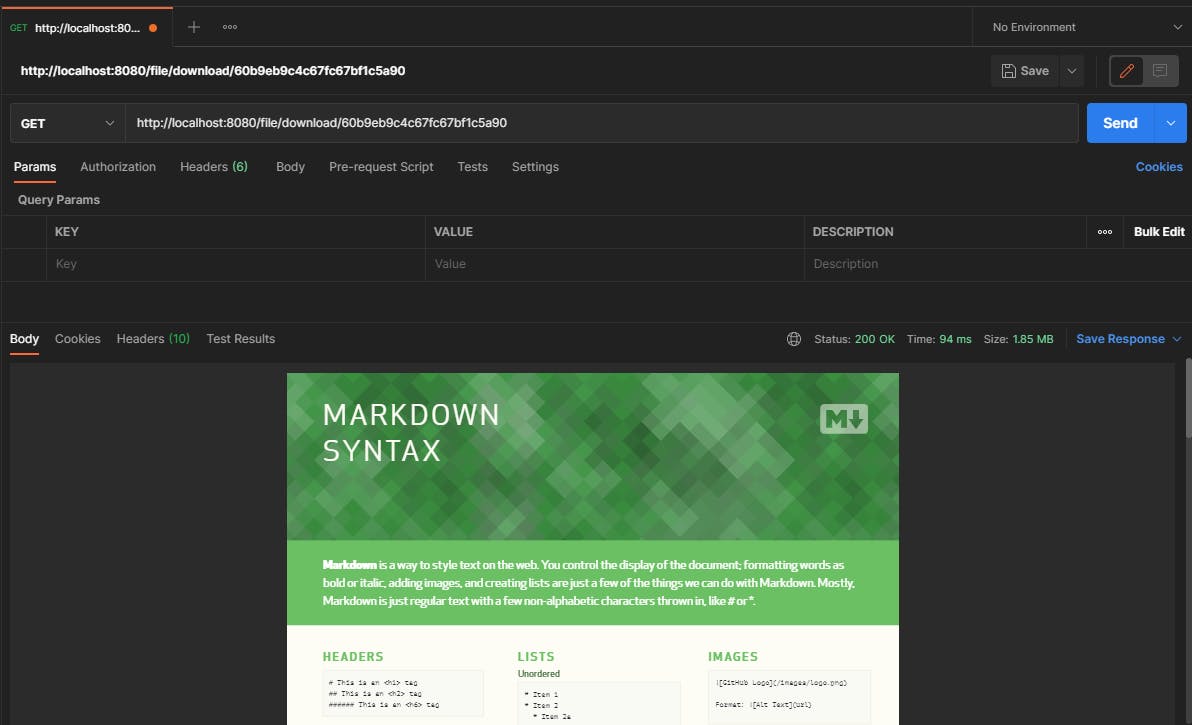
The GET method takes the {id} as a path parameter to return a specific document.
By download() method, receive the LoadFile object first, and then map the necessary details to a Response Header to make it downloadable.
*Note that we are returning the data as a ByteArrayResource.*
6. Testing REST end-points via Postman
Once you run the application, it can be accessed at [http://localhost:8080](localhost:8080)
# Upload File
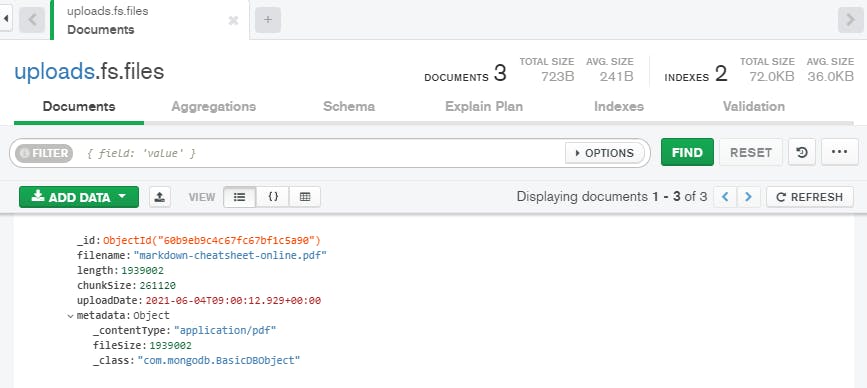 *fs.files collection with uploaded file’s metadata*
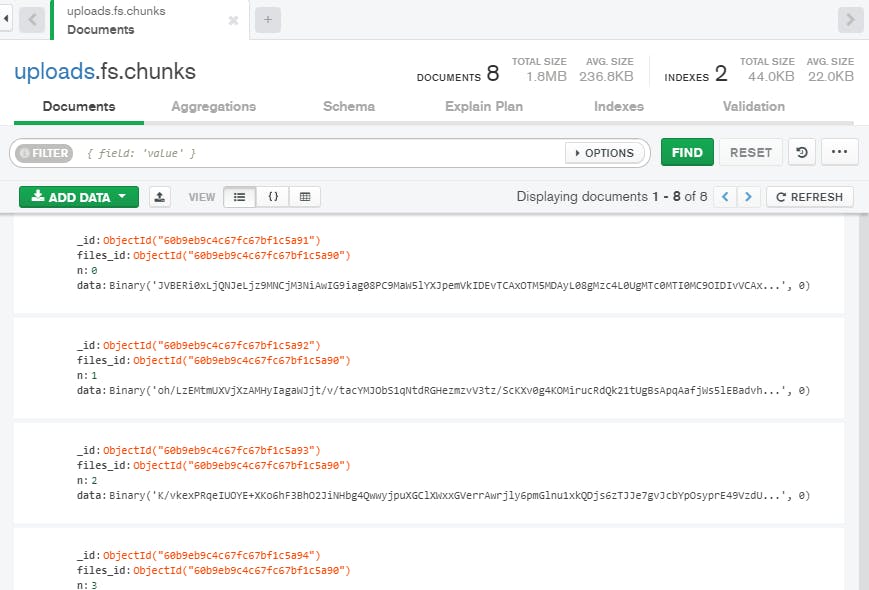 The uploaded file will be divided into several chunks and stored in fs.chunks collection
# Download File
7. Developing the FrontEnd
Now that we have finished our backend and it is working smoothly, let’s add a frontend. 😃
I have included all the frontend files in the src/main/resources/static folder.
# index.html
<!DOCTYPE html>
<html lang="en">
<head>
    <meta charset="UTF-8" name="viewport">
    <title>File Upload Example</title>
    <link rel="stylesheet" href="./css/main.css" />
</head>
<body>
    <noscript>
        <h2 style="text-align: center;">Sorry! Browser does not support Javascript.</h2>
    </noscript>
    <div class="file-container">
        <div class="file-upload-header">
            <h2>File Upload / Download Example</h2>
        </div>
        <div class="file-upload">
            <form id="fileUploadForm">
                <h3>File Upload</h3>
                <input type="file" name="file" id="fileUploadInput" class="file-input" required>
                <button type="submit" class="submit-btn">Upload</button>
            </form>
        </div>

        <div class="file-download">
            <div id="downloadFileUrl"></div>
        </div>
    </div>
    <script src="./js/main.js"></script>
</body>
</html>
# main.css
Let’s add some CSS to make it look less boring. 😅
* {
    -webkit-box-sizing: border-box;
    -moz-box-sizing: border-box;
    box-sizing: border-box;
}

body {
    background-color: #128ff2;
    margin: 0;
    padding: 0;
    font-weight: 400;
    font-family: "Helvetica Neue", Helvetica, Arial, sans-serif;
    font-size: 1rem;
    line-height: 1.58;
}

h1, h2, h3, h4, h5, h6 {
    margin-top: 20px;
    margin-bottom: 20px;
}

a {
    color: #128ff2;
}

.file-container {
    max-width: 700px;
    box-shadow: 0 1px 11px rgba(0, 0, 0, 0.27);
    margin: 60px auto 400px;
    padding: 20px;
    min-height: 300px;
    background-color: #fff;
}

.file-upload-header {
    text-align: center;
    border-bottom: 1px solid #ececec;
}

h3 {
    text-align: left;
    margin-left: 10px;
    margin-right: 10px;
}

.file-upload {
    text-align: center;
    padding-bottom: 20px;
}

.file-download {
    text-align: left;
    padding-bottom: 20px;
    margin-left: 10px;
    margin-right: 10px;
}

input[type="file"] {
    border: 1px solid #128ff2;
    max-width: 100%;
    padding: 7px;
}

.file-input {
    width: 100%;
}

.submit-btn {
    background-color: #128ff2;
    color: #fff;
    outline: none;
    vertical-align: middle;
    min-height: 40px;
    border: 1px solid transparent;
    border-radius: 5px;
    padding: 0 15px;
    box-shadow: 0 2px 2px 0 rgba(0,0,0,0.2);
    transition: all 0.2s ease-in-out;
    font-size: 14px;
}

.submit-btn:hover {
    background-color: #0c79d0;
}

@media screen and (min-width: 500px) {
    .file-input {
        width: calc(100% - 115px);
    }

    .submit-btn {
        display: inline-block;
        margin-top: 0;
        margin-left: 10px;
    }
}
# main.js
To make everything work, let’s add a bit of javascript.
'use strict'

let uploadForm = document.querySelector("#fileUploadForm");
let uploadFormInput = document.querySelector("#fileUploadInput");
let downloadFile = document.querySelector("#downloadFileUrl");

function uploadFile(file) {
    let formData = new FormData();
    formData.append("file", file);

    let req = new XMLHttpRequest();
    req.open("POST", "http://localhost:8080/file/upload")

    req.onload = function () {
        console.log(req.responseText);

        let response = req.responseText;

        if (response !== null) {
            let downloadUrl = "http://localhost:8080/file/download/" + response;

            downloadFile.innerHTML = '<p>File Upoaded Successfully. <br/> <a href="' + downloadUrl + '" target="_self">Download File</a></p>';
            downloadFile.style.display = "block";
        } else {
            alert("Error Occured! No file returned");
        }
    }

    req.send(formData);
}

uploadForm.addEventListener('submit', function (event) {
    const files = uploadFormInput.files;

    if (files.length !== 0 ) {
        uploadFile(files[0]);
        event.preventDefault();
    } else {
        alert('Please select a file')
    }

}, true);
Conclusion
I came across this topic when I was developing a web application for my 3rd-year project and I was struggling to find the right resources.
So, I hope this tutorial was helpful for you. 😊
Also, you can download this project from my GitHub repo here.
Check out these links to learn more about GridFS.
Until next time, Keep exploring !!! 🤓💪